
Tutorial : Amaria Bracelet
Technique : Right angle weave and netting
Level : Beginner

Length : around 6 inches without clasp
This is a very basic design using right angle weave as a main base and netting at the edge. The smaller one is one row and the big one is two rows. Just making one row twice separately and join them together.

Materials : for two rows.
- 7-8g. Miyuki seed beads 8/0, metallic bronze #457 (local shop, Bead Factory Thailand)
- 2-3g. Czech seed beads 11/0, opaque purple (beadaholique.com)
- Clasp
- Jumprings
- Nymo D or your preferred thread
- Beading needles

Materials : for one row.
- 4g Miyuki seed beads 8/0, metallic rainbow #760 (local shop, Bead Factory Thailand)
- 1-2g. Miyuki seed beads 11/0, dyed aqua silverlined alabaster #647 (local shop, Bead Factory Thailand)
- 1-2g. Miyuki seed beads 11/0, dyed aqua green silverlined alabaster #572 (local shop, Bead Factory Thailand)
- Clasp
- Jumprings
- Nymo D or your preferred thread
- Beading needles
As you can see, you only need seed beads in two sizes - 8/0 and 11/0.
In my one row bracelet, it hardly sees from the photo the different between blue and green. You can use just one color. Colors are always your choice.
Instruction :

1. Cut the thread at your comfortable length. I always use around two arms. Pick up four 8/0s.

2. Pass through all beads twice. Exit at the first 8/0 (red arrow). Leave the tail around 6 inches. You can use the tail to make the seed beads loop later.

3. Pick up 11/0. Pass through the next 8/0 (red arrow).

4. Repeat step 3 three times to add 11/0 around the unit. Exit at 8/0 (red arrow).

5. Pick up three 8/0s.

6. Pass through 8/0 from the first unit (red arrow). Continue through the next two 8/0s (red arrow).
If you can't get good tension, you can pass through all four 8/0s in the second unit.

7. Pick up three 8/0s.

8. Pass through 8/0 from the previous unit (red arrow). Pass through the next two 8/0s (blue arrow). Again, you can pass through all 8/0s in this unit to have good tension.

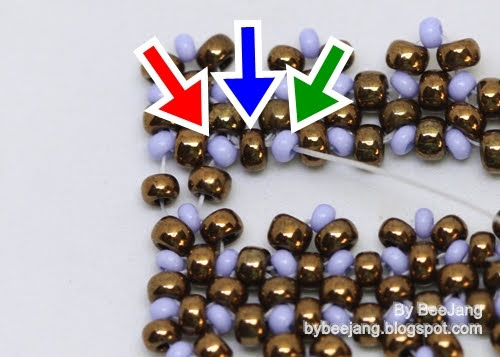
9. Pick up 11/0. Pass through the next 8/0 (red arrow).

10. Repeat step 9 all around the unit. Exit at 8/0 (red arrow).

11. Repeat step 5 - 10 until you get the desired length.

12. Pick up 8/0, 11/0 and 8/0. Pass through 11/0 (red arrow).

13. Pass through the next 8/0 and 11/0 (red and blue arrow).

14. Repeat step 12-14. Exit at 11/0 (red arrow).

15/1. If you are making one row bracelet, pick up five 11/0s. Pass through 11/0 (red arrow).

15/2. If you are making two rows, just pass through 8/0 and 11/0 (red arrow).

16. Pick up 8/0, 11/0 and 8/0. Pass through 11/0 (red arrow).

17. Pass through 8/0 and 11/0 (red and blue arrow).

18. Repeat step 16-17 until the end. Exit at 11/0 (red arrow).

19/1. If you are making one row, pick up five 11/0s. Pass through 11/0 (red arrow). And you can finish off your thread now.
Add jumprings and clasp to the seed beads loop at the end of the bracelet.

19/2. If you are making two rows, just set your first row aside. Make another row from step 1 to 15/2. Exit at 11/0 (red arrow).

20. Pick up 8/0. Pass through the top 11/0 at the first row (red arrow).
21. Pick up 8/0. Pass through 11/0 at the second row (red arrow), 8/0 and 11/0 (blue and green arrow).

22. Repeat step 20-21 to the end. Exit at 11/0 (red arrow).

23. Pick up 8/0, five 11/0s and 8/0. Pass through 11/0 (red arrow). You can pass through all beads in this seed beads loop to reinforce. And you can finish off the thread.

24. Don't forget the make the seed beads loop at this side too. You can use the tail from either the first or second row. Exit at 11/0 (red or blue arrow).
Pick up 8/0, five 11/0s and 8/0. Pass through 11/0 (blue or red arrow). Pass through all beads in this seed beads loop to reinforce and you can finish off the thread.

25. Add jumprings and clasp.

Done!
Happy beading!
Comments
Post a Comment