
Tutorial : Carrie
Carrier Beads Tutorials, Bracelet Tutorials
By BeeJang
I hope you will enjoy this free carrier beads tutorial!

Before I begin, you may ask what carrier bead is. It is a rectangular two holes bead, mostly in acrylic or glass. Beaders love to make peyote strip around them and connect many of them into a bracelet or necklace. Oh well, I think I'm bad at describing thing. You can google and you will see it. lol
This is the short free tutorial how I decorate my peyote strip on the carrier beads. However, I will not include the basic peyote stitch here.

Materials
Feel free to change or substitute beads as you like. The quantity will depend on the length of your bracelet and the colors you want to include in the design.
Here I used
- Carrier beads, acrylic 18x9 mm – Any color is fine, I used yellow, 7 beads. I got them from https://stores.ebay.com/yoyobeadsshop/ (from China)
- Miyuki delica 11/0 in two colors. I bought delica from http://www.beadsfactory.in.th (from Thailand, this is my local bead shop)
- DB324: Matte Met patina Iris
- DB237: Mint Green Ceylon
- Miyiki seed beads 15/0 - #4202 Duracoat gold. I believe I got this tube from Tamara Scott, https://www.etsy.com/shop/tamarascottdesigns (from USA), but I bought duracoat from many other sellers too.
- Pearl round 3mm – White, http://stores.ebay.com/beautyandthebeads/ (from China)
- Chinese round 3mm in two colors – Opaque green and dark blue. I got this from local shop at China Town in Bangkok, Thailand. You can use other beads here, round beads or fire polished round should do fine.
Instruction
My peyote strip is odd count, 7 beads wide and 50 rows in length. It will give a straight line when you do the embellishment on top.
But If you make even count peyote, it will give you a little tilt embellishment. If you don't mind about that, you can use even count peyote for easy beading. No problem at all.

Cut the thread around two arms. I start my odd count strip with one light green, five matte green and two light green delicas.
Pass back through matte green. Then, you can peyote all the way until you get 50 rows. Zip up two ends together. Exit your thread at any light green delica.

I spread the thin layer of glue on the carrier bead. Then, carefully slip the carrier bead inside the peyote strip. Roll the strip until your thread is at the corner.

 Pick up three 15/0s. Pass through the adjacent light green delica and the next matte green delica.
Pick up 15/0, round bead 3mm and 15/0. Then, pass through the matching matte green delica across the strip and light green delica.
 Pick up three 15/0s. Pass through the adjacent light green delica to create the picot.
Then, pass through the adjacent light green delica.
 Pick up three 15/0s. Pass through the adjacent light green delica and the next matte green delica.
 Pick up 15/0, round bead 3mm and 15/0. Pass through the matching matte green delica across the strip and light green delica.
Pick up three 15/0s and pass through the adjacent light green delica to make a picot.
Then, pass through the adjacent light green delica.

Now, you can repeat the same way and change the round bead 3mm as you go.

You can connect two components any way you like. This is how I did. In the photo, you can see that I haven't done the embellishment for the second component yet. They will share the same connecting beads.

 At the second component, exit at the light green delica at the edge and corner. Pick up three 15/0s. Pass through the adjacent light green delica and matte green delica.
Pick up 15/0. Pass through round bead 3mm from the first component. Then, pick up 15/0. Pass through matte green delica and light green delica at the edge.
 Pick up three 15/0s and pass through the adjacent light green delica to make a picot.
Continue through matte green delica, 15/0, round bead 3mm, 15/0, matte green delica and light green delica.
Actually, you can weave through your peyote strip to get to the other side but I prefer to go the connecting beads one more time. It's always good to reinforce your thread path at the connecting point.
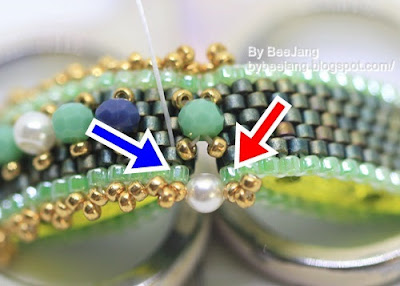

You should exit at light green delica now (red arrow). Pick up pearl 3mm and pass through the matching light green delica at the other component (blue arrow).
Then, pass through matte green delica, 15/0, round bead 3mm, 15/0, matte green delica and light green delica at the edge.
 Pick up pearl 3mm. Pass through the matching light green delica at the second component.
The connection is done now. But I suggest you to reinforce your thread path for the two pearls here again.

My bracelet used seven components. The length is around 6.5 inches without clasp.
For the clasp part, I just made simple seed beads loop using seven 15/0s and used jumpring and magnetic clasp.
You can download this free carrier beads tutorial in pdf file here,
https://drive.google.com/open?id=1DryXL-XcWEjMCFAJW-NWaCN5xUHay_4A
Have Fun and Happy beading!
Carrier Beads Tutorials, Bracelet Tutorials
By BeeJang
I hope you will enjoy this free carrier beads tutorial!

Before I begin, you may ask what carrier bead is. It is a rectangular two holes bead, mostly in acrylic or glass. Beaders love to make peyote strip around them and connect many of them into a bracelet or necklace. Oh well, I think I'm bad at describing thing. You can google and you will see it. lol
This is the short free tutorial how I decorate my peyote strip on the carrier beads. However, I will not include the basic peyote stitch here.

Materials
Feel free to change or substitute beads as you like. The quantity will depend on the length of your bracelet and the colors you want to include in the design.
Here I used
- Carrier beads, acrylic 18x9 mm – Any color is fine, I used yellow, 7 beads. I got them from https://stores.ebay.com/yoyobeadsshop/ (from China)
- Miyuki delica 11/0 in two colors. I bought delica from http://www.beadsfactory.in.th (from Thailand, this is my local bead shop)
- DB324: Matte Met patina Iris
- DB237: Mint Green Ceylon
- Miyiki seed beads 15/0 - #4202 Duracoat gold. I believe I got this tube from Tamara Scott, https://www.etsy.com/shop/tamarascottdesigns (from USA), but I bought duracoat from many other sellers too.
- Pearl round 3mm – White, http://stores.ebay.com/beautyandthebeads/ (from China)
- Chinese round 3mm in two colors – Opaque green and dark blue. I got this from local shop at China Town in Bangkok, Thailand. You can use other beads here, round beads or fire polished round should do fine.
Instruction
My peyote strip is odd count, 7 beads wide and 50 rows in length. It will give a straight line when you do the embellishment on top.
But If you make even count peyote, it will give you a little tilt embellishment. If you don't mind about that, you can use even count peyote for easy beading. No problem at all.

Cut the thread around two arms. I start my odd count strip with one light green, five matte green and two light green delicas.
Pass back through matte green. Then, you can peyote all the way until you get 50 rows. Zip up two ends together. Exit your thread at any light green delica.

I spread the thin layer of glue on the carrier bead. Then, carefully slip the carrier bead inside the peyote strip. Roll the strip until your thread is at the corner.


Pick up 15/0, round bead 3mm and 15/0. Then, pass through the matching matte green delica across the strip and light green delica.

Then, pass through the adjacent light green delica.


Pick up three 15/0s and pass through the adjacent light green delica to make a picot.
Then, pass through the adjacent light green delica.

Now, you can repeat the same way and change the round bead 3mm as you go.

You can connect two components any way you like. This is how I did. In the photo, you can see that I haven't done the embellishment for the second component yet. They will share the same connecting beads.


Pick up 15/0. Pass through round bead 3mm from the first component. Then, pick up 15/0. Pass through matte green delica and light green delica at the edge.

Continue through matte green delica, 15/0, round bead 3mm, 15/0, matte green delica and light green delica.
Actually, you can weave through your peyote strip to get to the other side but I prefer to go the connecting beads one more time. It's always good to reinforce your thread path at the connecting point.


You should exit at light green delica now (red arrow). Pick up pearl 3mm and pass through the matching light green delica at the other component (blue arrow).
Then, pass through matte green delica, 15/0, round bead 3mm, 15/0, matte green delica and light green delica at the edge.

The connection is done now. But I suggest you to reinforce your thread path for the two pearls here again.

My bracelet used seven components. The length is around 6.5 inches without clasp.
For the clasp part, I just made simple seed beads loop using seven 15/0s and used jumpring and magnetic clasp.
You can download this free carrier beads tutorial in pdf file here,
https://drive.google.com/open?id=1DryXL-XcWEjMCFAJW-NWaCN5xUHay_4A
Have Fun and Happy beading!
Thank you, such a nice idea! Thanks for sharing with us.
ReplyDeleteGreetings
Silke
Thanks! I'm glad you like the tutorial. Happy beading!
DeleteThis is really beautiful! The segments caught my eye as well as the design and color. Thanks for giving me another project to work on.
ReplyDeleteThank you! Have fun beading! :D
DeleteWow! Thank you for sharing your pattern, this is a really appealing way to use the carrier beads <3
ReplyDeleteGlad you like it. Happy beading!
DeleteExcellent and beautiful. Your instructions are very well written. This has gives me some ideas for my carriers. Thinking of black/copper, black/bronze and black/gold. Then doing 1, 2 together, 3 together, then 2 then 1 for necklace. Thank you again for the inspiration.
ReplyDeleteYour colors definitely turn out very lovely. Glad you like the tutorials. :D
DeleteVery cute! Thank you for the tute!
ReplyDelete